The kitchen is often called the heart of the home, but when that heart feels tired, dark, or outdated, it can bring down the energy of the entire house. Many homeowners stare at their orange-toned oak or chipped laminate and assume the only solution is a full-scale demolition.
However, ripping out cabinetry is messy, incredibly expensive, and leaves you without a kitchen for weeks. Fortunately, you do not need a dumpster in your driveway to achieve a stunning transformation. If the bones of your cabinetry are structurally sound, you have a blank canvas waiting for a creative touch.
You can update kitchen cabinets using a variety of accessible methods that range from simple afternoon projects to more involved weekend renovations. This guide explores effective, budget-conscious strategies to breathe new life into your space.
Whether you are a DIY novice looking for a quick fix or a seasoned homeowner ready to tackle a larger project, these solutions allow you to modernize your kitchen while keeping your existing layout – and your bank account intact.
1. Paint Your Cabinets to Update the Look
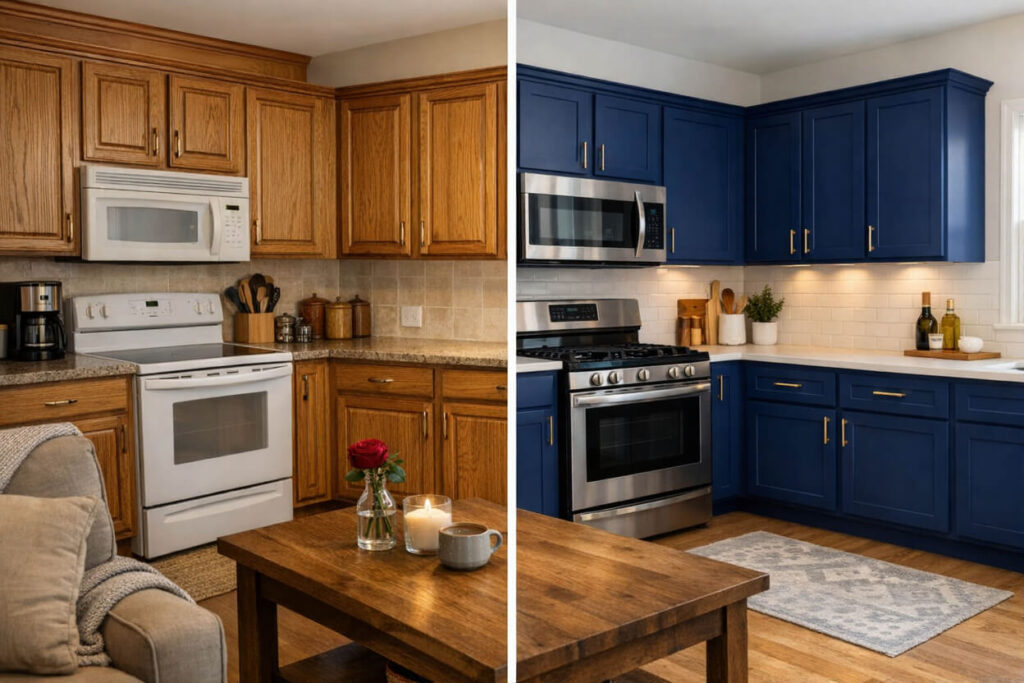
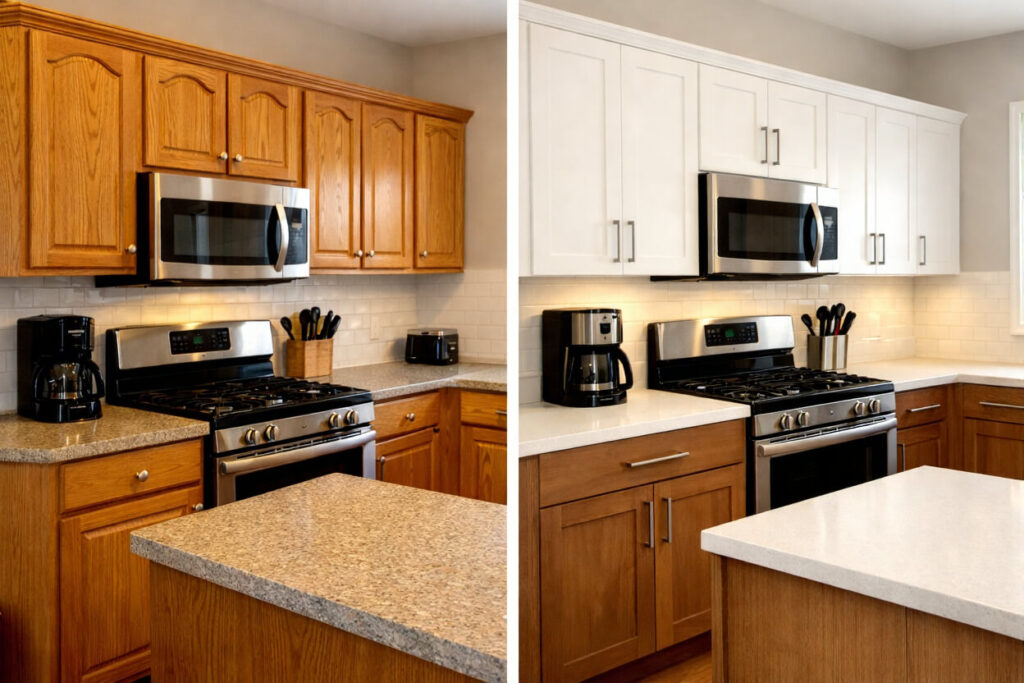
Painting is widely considered the most transformative DIY project you can undertake in a kitchen. It allows you to completely change the color palette of the room without removing a single box.
Whether you choose a crisp, clean white to brighten a small space or a moody navy blue for a sophisticated touch, a fresh coat of paint hides dated wood grains and yellowing varnish instantly. The result often looks like a brand-new installation for the cost of a few gallons of high-quality enamel.
To get a professional finish, preparation is more important than the actual painting. You must thoroughly clean the surfaces with a degreaser to remove years of cooking oils, sand the wood to create a grip for the primer, and use a paint specifically designed for cabinetry.
While it takes time and patience, the durability of modern self-leveling paints means your brush strokes will disappear, leaving a smooth, factory-like finish.
This approach is best tackled when you have a few days to spare, as drying times between coats are critical. It works on almost any material, including wood, laminate, and metal. If you want to update kitchen cabinets with the highest return on investment, painting them is the undisputed champion of renovation hacks.

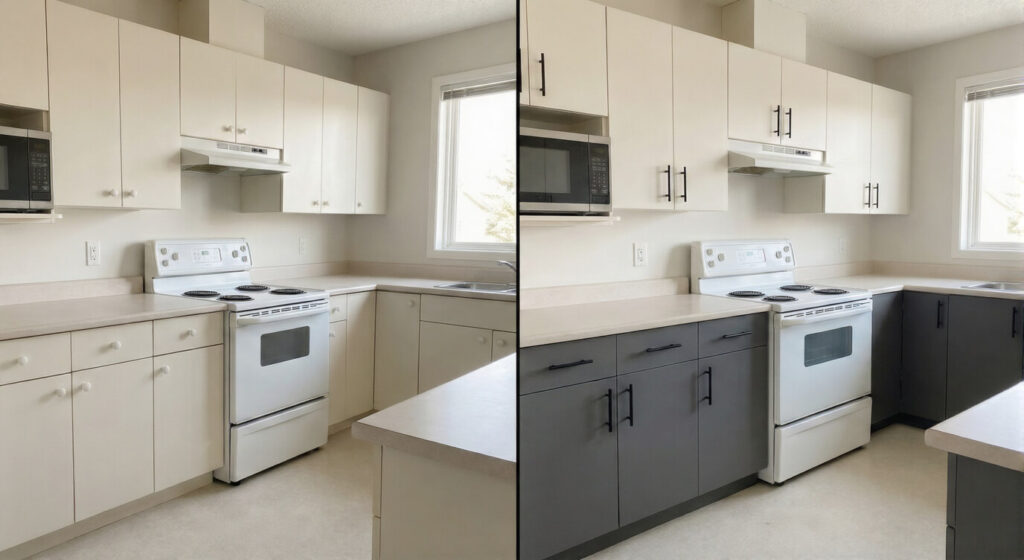
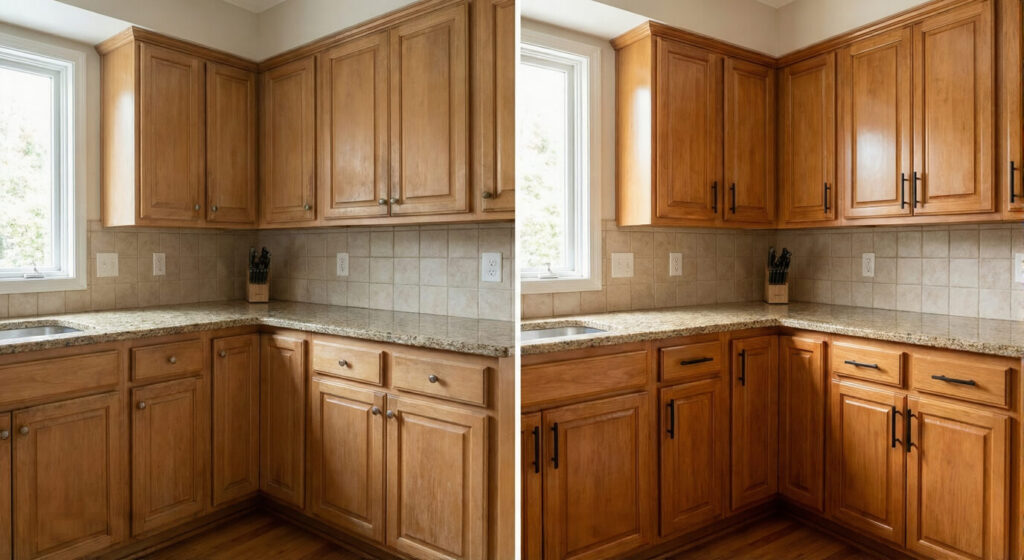
2. Update Kitchen Cabinets with New Hardware

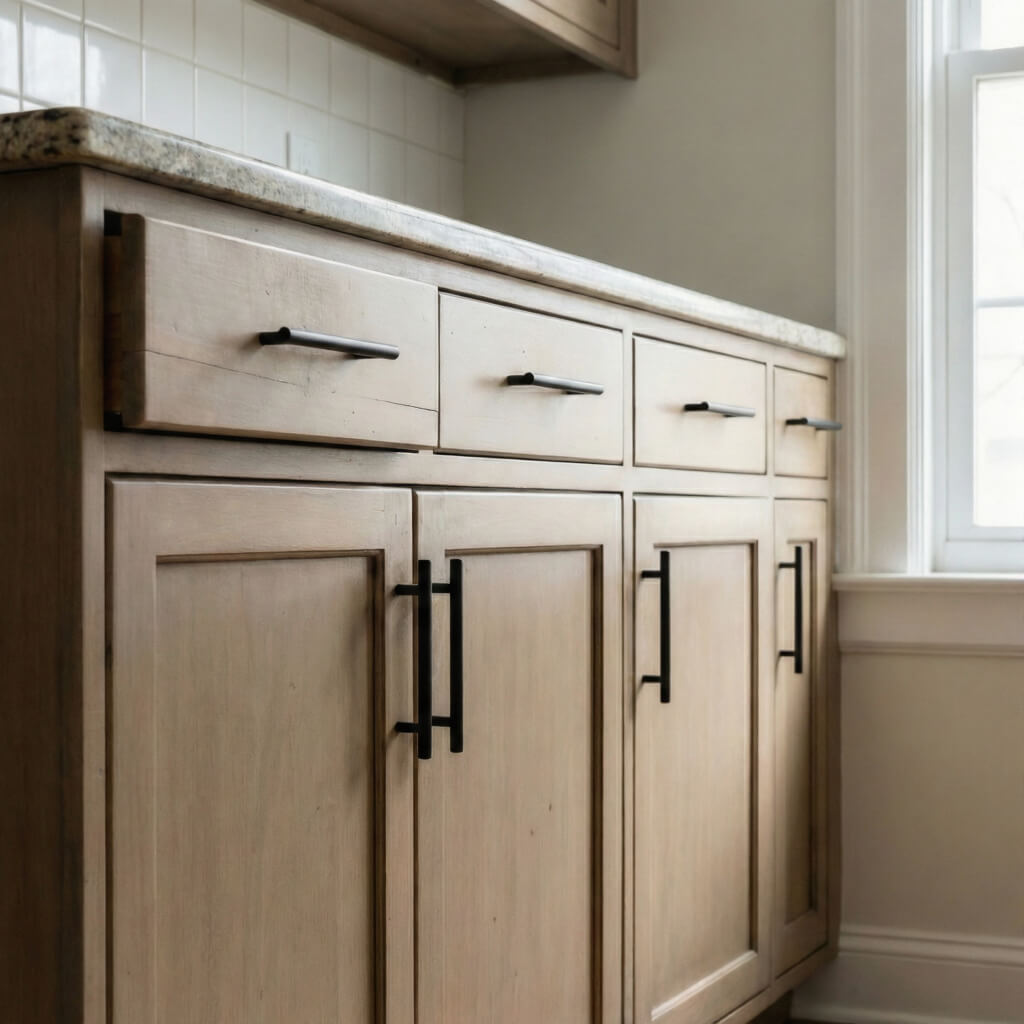
If painting feels like too big a commitment, swapping out your hardware is the perfect low-effort alternative. Think of knobs and pulls as the jewelry of your kitchen; they add sparkle, contrast, and style to plain doors.
Replacing tarnished brass hinges or cheap plastic handles with sleek matte black pulls or brushed nickel knobs can instantly modernize the entire room.
This method works because hardware trends shift significantly over the decades. A simple switch from a center-mounted knob to a long, modern bar pull can trick the eye into seeing the cabinet door itself as more contemporary.
It also improves functionality, as sturdy new handles can make heavy drawers easier to open. You simply need a screwdriver and a measuring tape to ensure your new choices fit the existing drill holes.
This is an ideal solution for renters or homeowners working with a strict budget. It requires zero mess and can be completed in under an hour.
When shopping, consider the weight and feel of the hardware; heavier metal pieces tend to feel more expensive and durable, elevating the tactile experience of your kitchen every time you cook.
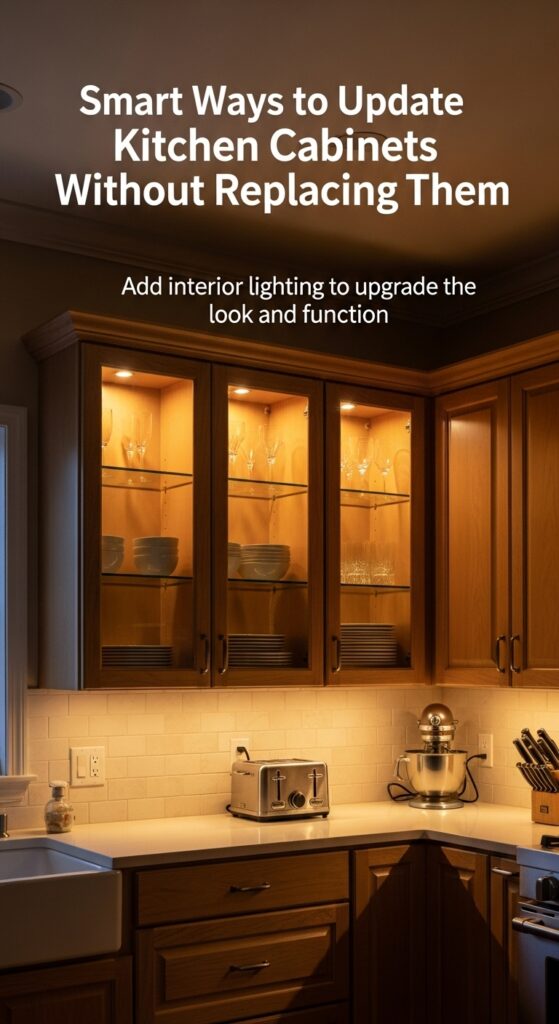
3. Install Under-Cabinet Lighting
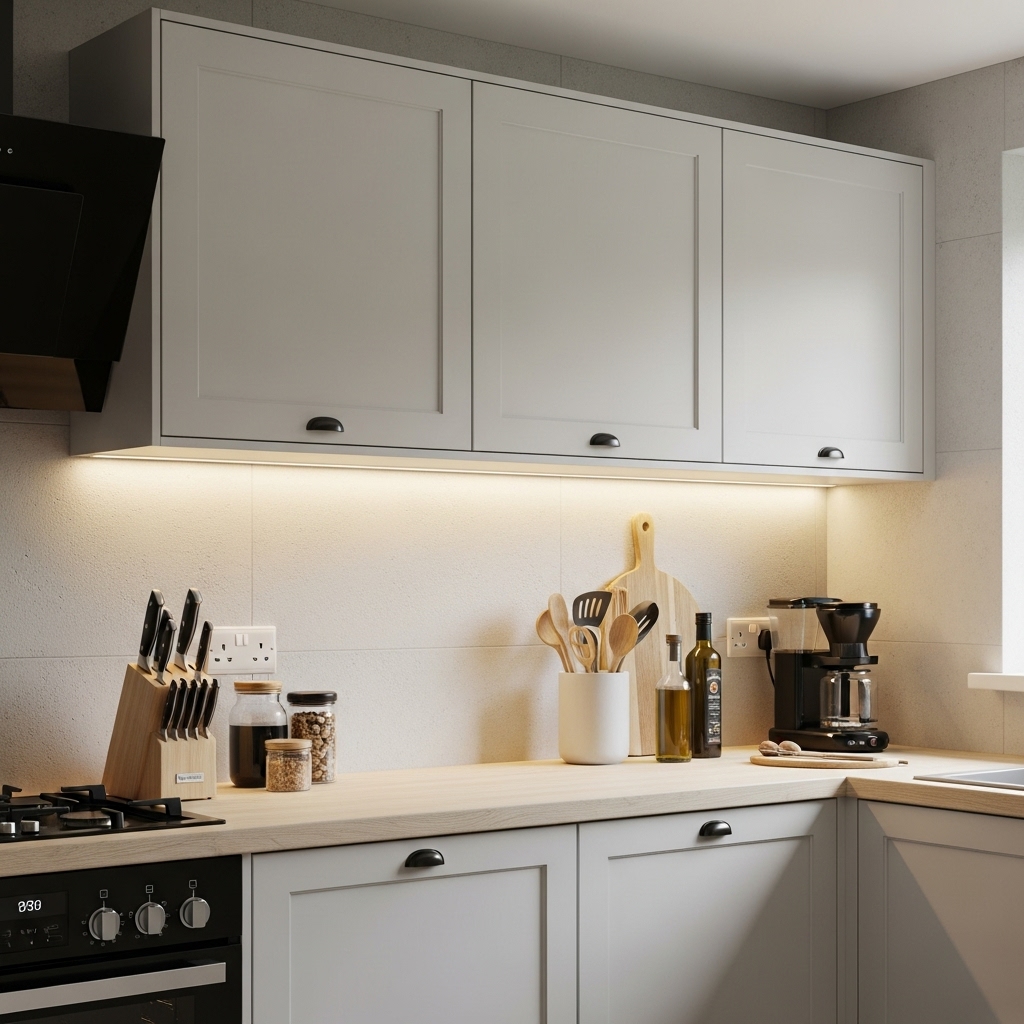
Lighting changes everything about how a room looks and feels. Shadows cast by upper cabinets can make your countertops feel dark and cramped, regardless of how clean they are.
Installing under-cabinet lighting adds both task lighting for food preparation and ambient lighting that highlights your backsplash and counters. This update works by creating depth and dimension.
When the workspace is illuminated, the kitchen feels larger and more inviting. Modern LED strip lights are thin, energy-efficient, and easy to hide behind the front lip of your cabinets. You can choose warm white for a cozy traditional vibe or cool white for a sleek, modern industrial look.
You do not necessarily need an electrician for this upgrade. Many systems are plug-in or battery-operated, featuring motion sensors or remote controls. This is particularly useful in older homes where overhead lighting is sparse.
By focusing on illumination, you update kitchen cabinets by changing the way the eye perceives them, shifting the focus from the cabinet finish to the warm glow of the room.
4. Roll Out a Two-Tone Color Scheme
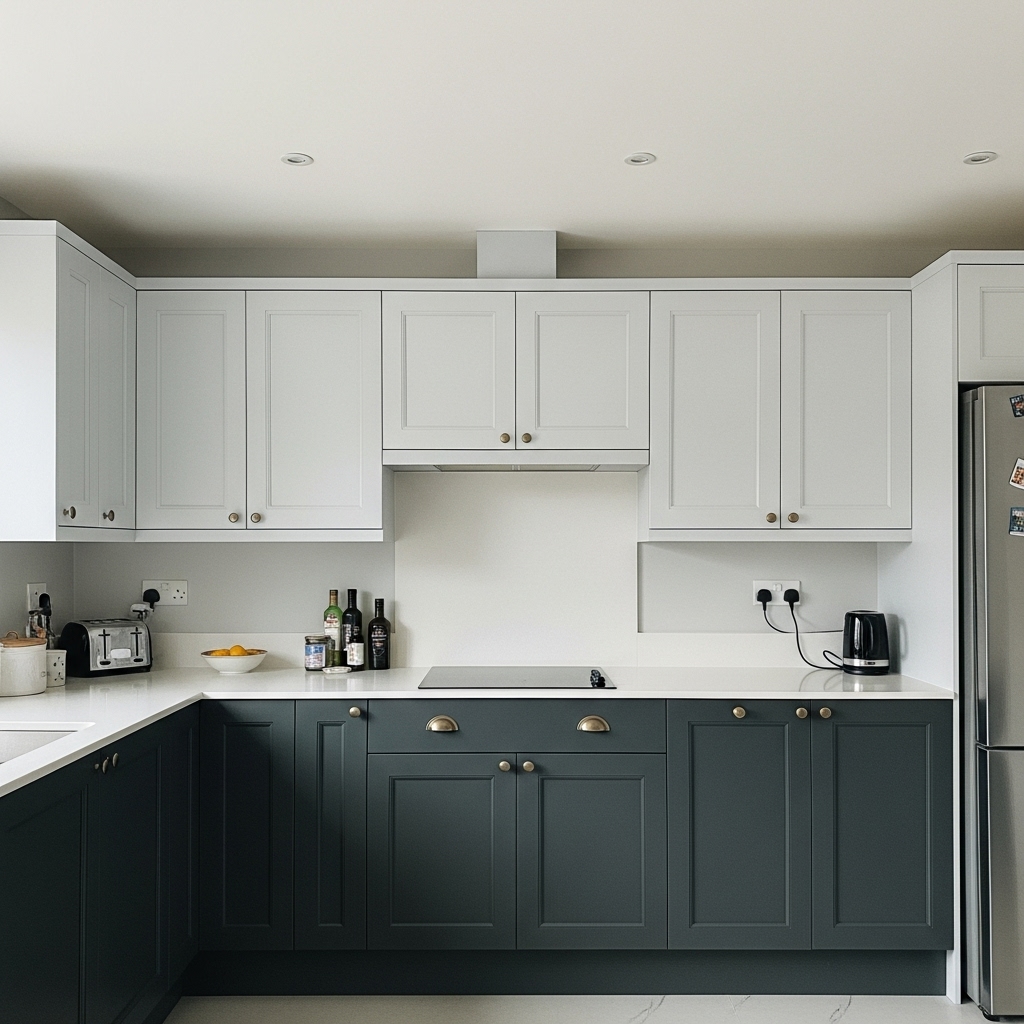
The two-tone trend has taken the design world by storm, and it is a fantastic way to compromise if you are afraid of bold colors.
This usually involves painting the lower cabinets a darker, grounding shade; like charcoal, forest green, or navy while keeping the upper cabinets white or a light neutral. This technique anchors the kitchen visually while keeping the upper portion airy and open.
This design strategy solves the problem of heavy, dark kitchens. By keeping the eye-level cabinets light, the ceiling feels higher and the room wider. Meanwhile, the darker base cabinets hide scuffs and footprints much better than white ones, making this a practical choice for families with young children or pets.
Applying a two-tone scheme can also save you time if your upper cabinets are already a neutral color you like. You might only need to paint the island or the bottom run of drawers to achieve a completely new aesthetic.
It creates a custom, designer look that suggests a high-end renovation rather than a simple DIY update.
5. Update Kitchen Cabinets with Crown Molding

Standard builder-grade cabinets often stop several inches or even feet short of the ceiling, leaving an awkward gap that collects dust.
Adding crown molding to the tops of your upper cabinets draws the eye upward and gives the cabinetry a built-in, furniture-quality appearance. It creates a seamless transition between the wood and the ceiling, making the joinery look substantial and expensive.
The visual weight of crown molding adds elegance and architectural interest to a plain boxy kitchen. It is especially effective in traditional or transitional style homes. Even a simple, flat piece of trim can make a modern kitchen look more finished.
The key is to match the paint or stain of the molding perfectly to your existing cabinet color so that they look like a single unit.
This project involves some precise measuring and cutting, specifically with miter angles, so it is a step up in skill level. However, lightweight foam or polyurethane moldings are now available that mimic wood but are much easier to cut and install.
Once caulked and painted, no one will know it wasn’t part of the original installation.
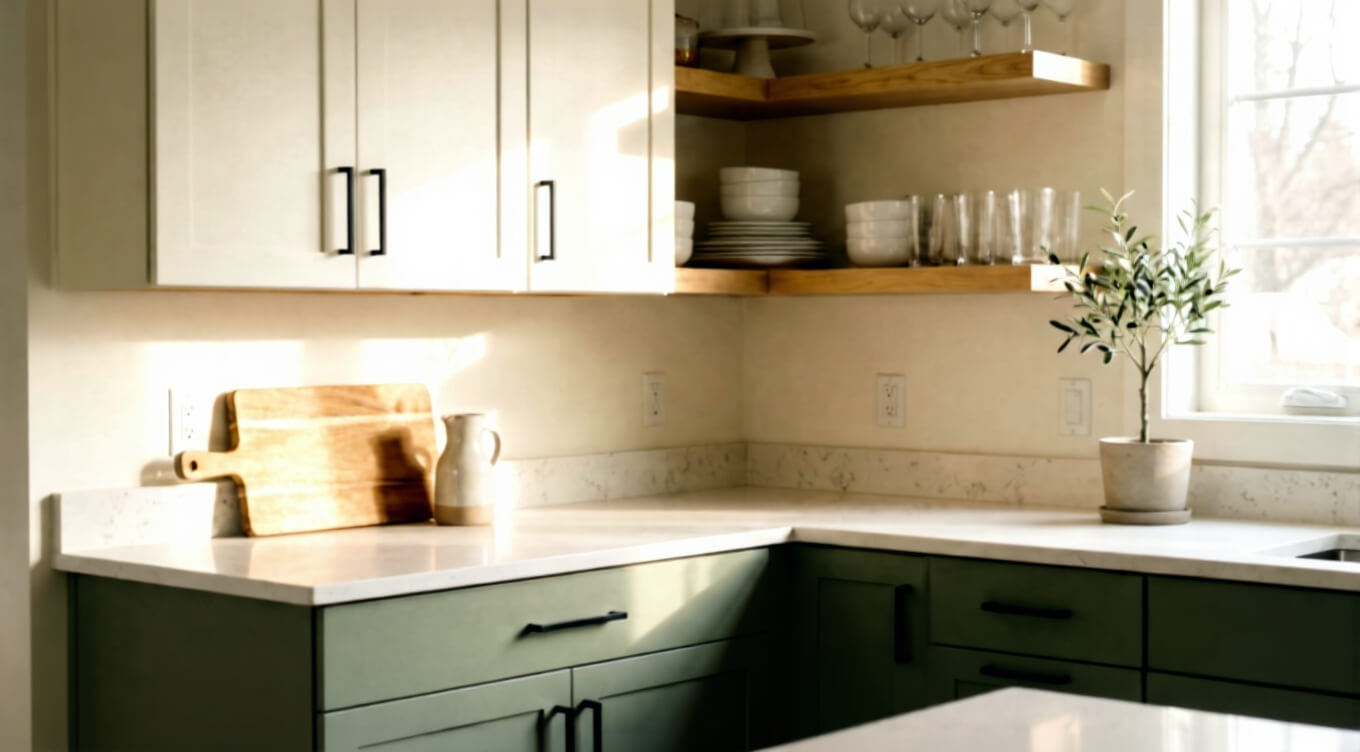
6. Remove Doors for Open Shelving
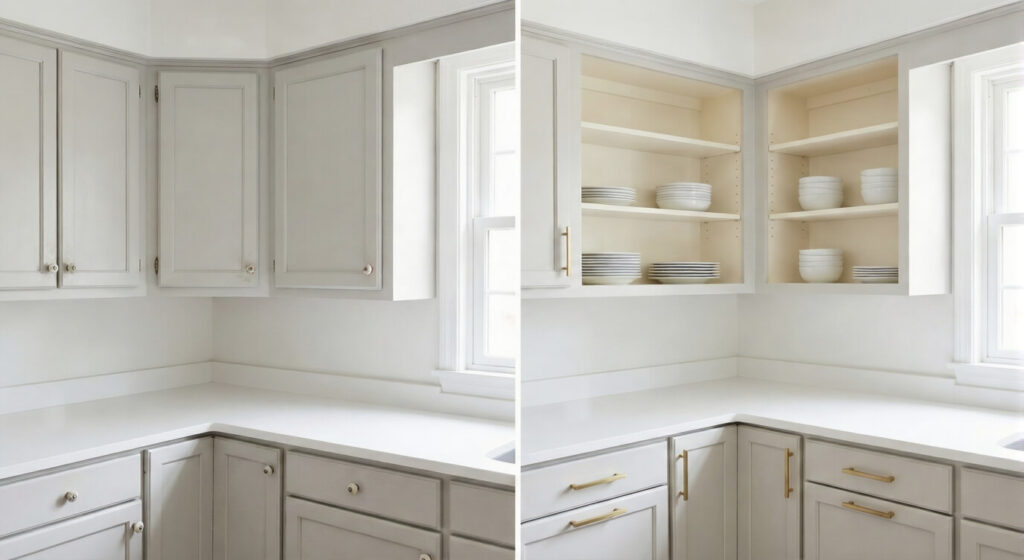
One of the boldest moves you can make is to remove the doors entirely from selected upper cabinets.
Open shelving is a massive trend that forces a sense of airiness and allows you to display beautiful dishware, cookbooks, or plants. This breaks up the monotony of a wall full of cabinet doors and adds personality to the kitchen.
This method requires almost no budget; just a screwdriver and some wood filler to patch the hinge holes. Once the doors are gone, you can paint or wallpaper the back interior of the cabinet to create a focal point. It encourages you to declutter and organize, as your items are now on display.
This is best utilized strategically rather than everywhere. Pick a cabinet near the sink or the stove where you grab items frequently. It creates a breezy, cottage-style or industrial vibe depending on how you style the shelves.
If your cabinet interiors are rough, you might need to add a thin veneer or a coat of paint to make them presentation-ready.
7. Reface the Frame and Replace Doors
If your cabinet boxes are solid but the door style is hopelessly outdated; like those arched cathedral doors from the 90s, refacing is the middle ground between painting and replacing.
Refacing involves applying a new wood veneer to the visible exterior frames of your cabinet boxes and purchasing brand new doors and drawer fronts to match. This allows you to change the physical profile of your kitchen.
You can switch from a busy raised-panel door to a sleek Shaker style or a modern flat slab. Because you are keeping the boxes, you save the cost of demolition and the price of the cabinet carcasses. The result is indistinguishable from brand new cabinetry to the naked eye.
While this is more expensive than painting, it is significantly cheaper than a full remodel. It is an excellent option when the finish of your existing cabinets is peeling or damaged beyond what paint can hide.
Refacing provides a durable, factory-finish exterior that will last for another decade or more, helping you update kitchen cabinets with minimal waste.
8. Update Your Kitchen Cabinets with Glass Inserts
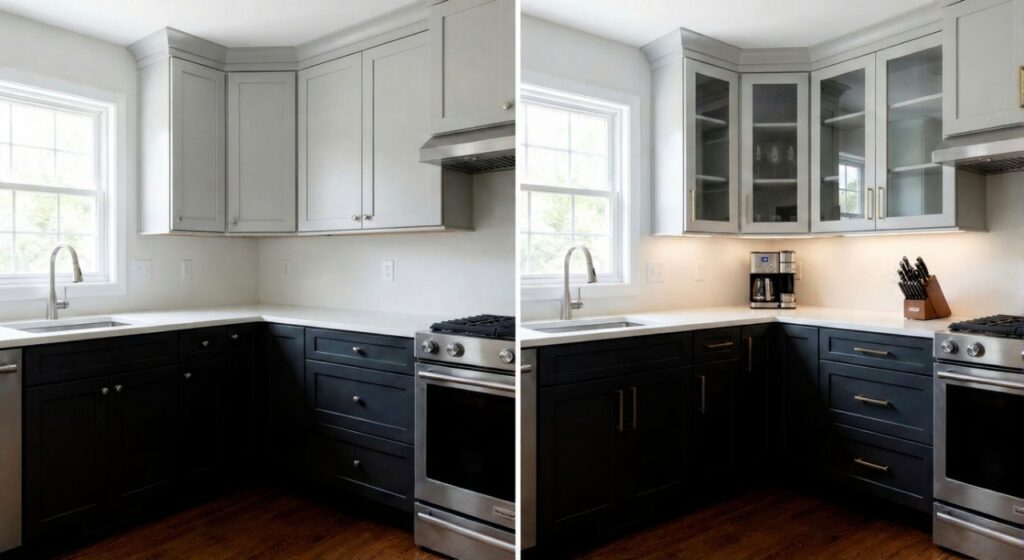
Replacing the solid center panel of a cabinet door with glass is a classic way to lighten up a kitchen. It mimics the look of a china hutch and breaks up solid walls of wood. Glass inserts reflect light, making the kitchen feel brighter and more open, while still protecting your dishes from dust and grease.
You can customize the look based on the type of glass you choose. Clear glass is traditional, frosted glass hides clutter while keeping the airy feel, and seeded or leaded glass adds a vintage, historic charm.
This project involves using a router to cut out the center panel of your existing wood doors and securing a pane of glass in the recess. This is particularly effective on corner cabinets or isolated upper cabinets flanking a window or range hood.
It adds high-end variety to the room. If you are not comfortable cutting the doors yourself, many local glass shops can do the installation if you bring them the doors. It’s a sophisticated upgrade that adds significant visual value.
9. Apply Beadboard Wallpaper or Paneling
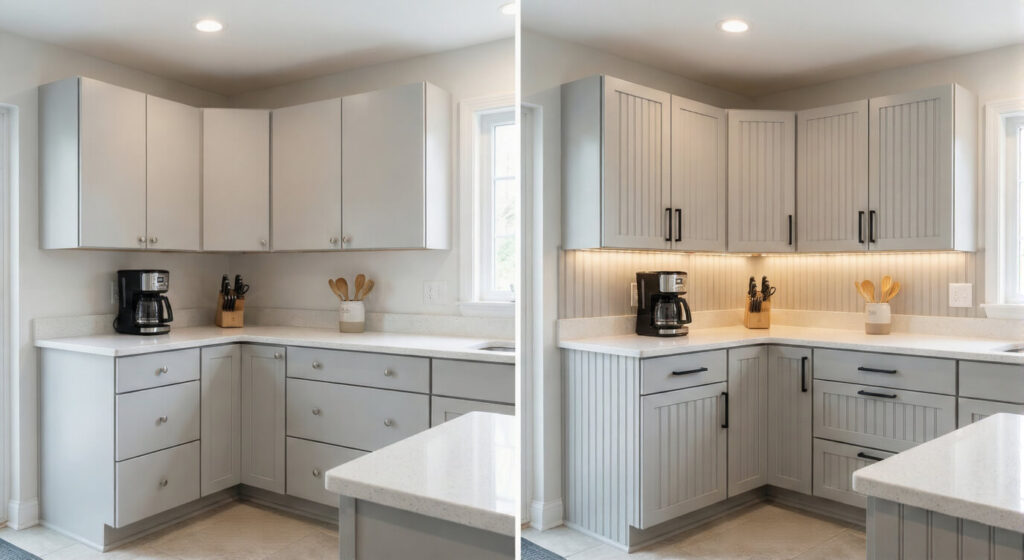
Texture is often the missing element in a bland kitchen. Beadboard offers a classic, farmhouse, or coastal aesthetic that feels cozy and timeless.
You can apply beadboard wallpaper (which is paintable and textured) or thin beadboard wood paneling to the recessed center panels of your cabinet doors or the exposed sides of the cabinet boxes.
This technique is brilliant for covering up damage on flat doors or adding interest to plain surfaces. If your cabinet ends are just flat laminate, wrapping them in beadboard instantly makes them look custom-built. Once painted, the vertical lines of the beadboard add height and structure to the design.
Beadboard wallpaper is incredibly budget-friendly and forgiving to install. It covers minor dings and scratches effortlessly. This approach works best when you plan to paint the cabinets afterward, as the paint will seal the wallpaper or paneling and unify it with the frame.
10. Add Furniture Legs for a Custom Style
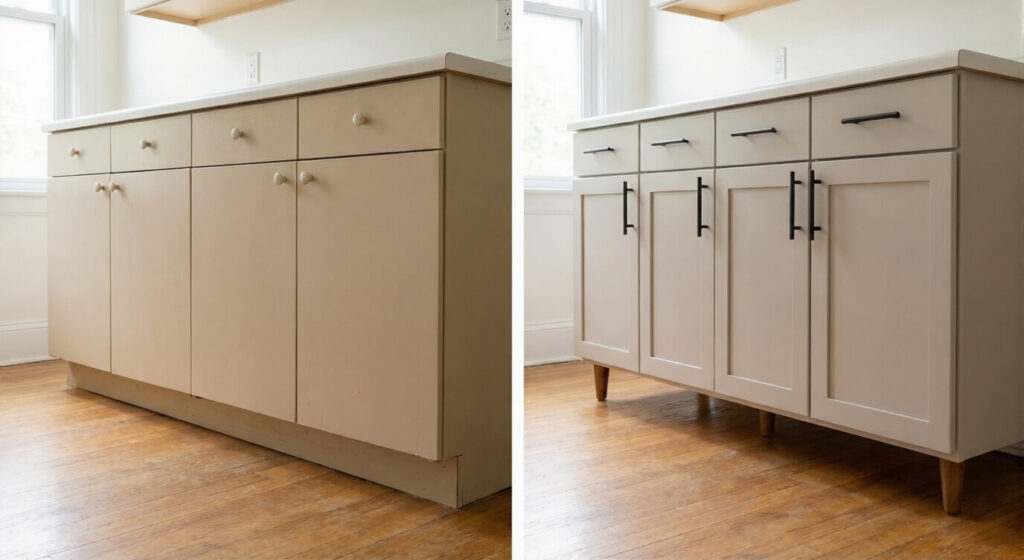
Standard kitchen cabinets usually sit on a recessed toe kick, which is practical but purely utilitarian. To give your kitchen an unfitted, bespoke furniture look, you can install decorative feet or legs to the base of your cabinets.
This is often seen in high-end English cottage kitchens or luxury traditional designs. By adding bun feet or tulip feet to the corners of your base cabinets or the kitchen island, you change the silhouette of the joinery.
It makes the cabinets look like freestanding chests of drawers rather than boxes screwed to the wall. This small architectural detail has a disproportionately large impact on the style of the room.
You can buy these legs at most hardware stores or woodworking suppliers. They usually need to be glued or screwed into place and then painted to match the cabinetry. It is a subtle tweak that designers use to elevate standard builder-grade islands into centerpiece features.
11. Distressed Finishes for a Rustic Vibe
If you love the rustic, farmhouse, or shabby chic look, distressing your cabinets can turn wear and tear into a design feature. Instead of trying to achieve a perfect, glossy finish, you intentionally weather the wood to give it a lived-in, antique charm.
This style is incredibly forgiving and low-maintenance, as future scratches just blend in with the design.
Techniques for distressing include sanding down edges to reveal the wood beneath, using a dry brush technique with a secondary color, or applying a dark glaze over a lighter paint color to highlight crevices and details. This adds warmth and history to a sterile kitchen.
This approach works best on cabinets with some texture or detailing, like raised panels, where the glaze can settle. It is less effective on flat, modern slab doors. It allows you to embrace the imperfections of older cabinetry rather than fighting them.
By antiquing your joinery, you create a cozy, welcoming atmosphere that feels collected over time.
12. Use Peel-and-Stick Paper for Renter-Friendly Updates
For renters or homeowners who aren’t ready for permanent changes, peel-and-stick contact paper or vinyl wrap is a miracle material. Modern vinyl wraps come in incredibly realistic finishes, including marble, wood grain, and high-gloss colors.
You can wrap the cabinet doors or line the shelves and back panels for a pop of pattern. This update is entirely reversible. When you move out or change your mind, you simply peel it off with the help of a hairdryer.
It allows you to experiment with bold trends, like a geometric pattern on the inside of a cabinet or a matte black finish on the exterior, without the risk of ruining the wood.
Applying vinyl wrap requires patience to avoid air bubbles, but it is much faster than painting. It is also water-resistant and easy to wipe clean, making it practical for the kitchen environment.
This method empowers you to update kitchen cabinets temporarily, giving you control over your environment regardless of your lease agreement.
13. Install Pull-Out Shelves for Functional Updates
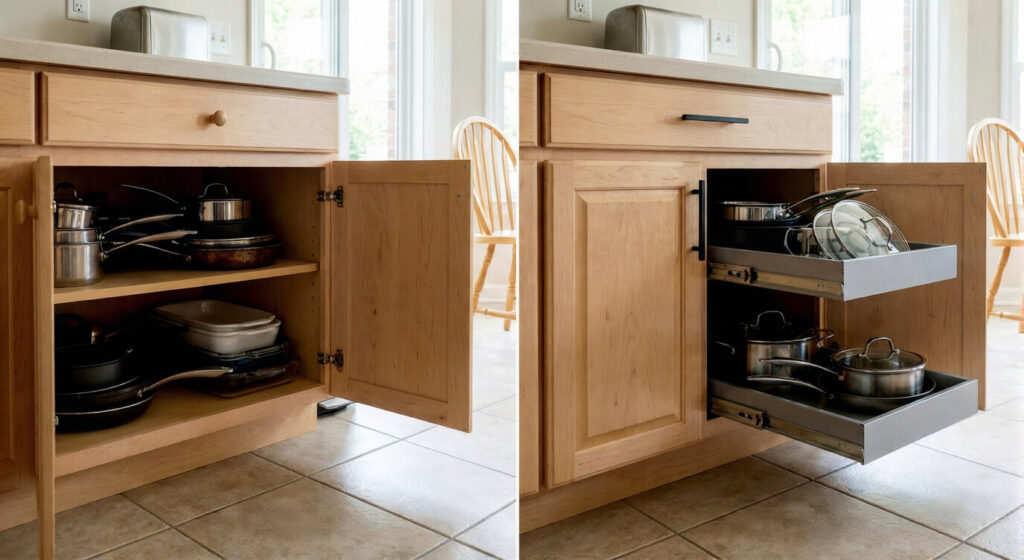
Sometimes the update your kitchen needs is functional rather than aesthetic. Older cabinets often have deep, dark shelves where Tupperware goes to disappear forever. Installing retrofitted pull-out shelves or sliding drawers into your existing cabinets transforms the usability of your storage.
Accessing pots, pans, and dry goods becomes effortless when the shelf slides out to meet you. This modernization makes an old kitchen feel high-tech and ergonomically friendly. It saves your back and knees, and it increases your storage capacity because you can utilize the full depth of the cabinet.
You can buy ready-made kits that screw into the bottom of your cabinet box. This upgrade pairs beautifully with other aesthetic updates. When you open a freshly painted cabinet and find a smooth-gliding organizer inside, the kitchen feels brand new. It bridges the gap between old construction and modern convenience.
14. Polish and Deep Clean Natural Wood
Ideally, some cabinets don’t need to be covered up; they just need to be loved. If you have high-quality solid wood cabinets that have become dull, greasy, or sticky over the years, a restoration might be all that is required.
A deep clean using a wood-safe degreaser followed by a conditioning oil or wax can bring back the luster and richness of the grain.
Over time, cooking vapors create a film that dulls the finish. Removing this grime often reveals that the wood underneath is in excellent condition. Products like beeswax or orange oil can hydrate the wood, hiding minor scratches and restoring the warm glow that made you like the cabinets in the first place.
This is the most cost-effective method to update kitchen cabinets and requires the least amount of skill. It respects the original material and refreshes the room’s scent and feel.
If the varnish is worn, a light “screen and recoat” (light sanding and fresh clear coat) can protect the wood for years to come without changing the color.
FAQs
Q1. What is the cheapest way to update kitchen cabinets?
The most budget-friendly method is usually a deep clean followed by swapping out the hardware. A bottle of wood cleaner and a pack of modern knobs can cost less than $100 but significantly change the look of the room. If you are willing to put in labor, painting is the next most cost-effective option for a dramatic change.
Q2. Can I update my cabinets if I am renting?
Yes, renters have several reversible options. Using peel-and-stick vinyl wrap on the doors or shelves allows you to change the color without permanent damage. Swapping out the handles is also allowed in most leases, provided you keep the old hardware and reinstall it before you move out.
Q3. How do I update kitchen cabinets without painting them?
If you want to keep the wood look but refresh the style, focus on “accessories” and surroundings. Install new, modern hardware, add under-cabinet lighting to brighten the wood, or remove a few doors for open shelving. Adding crown molding or decorative feet can also change the silhouette without a drop of paint.
Q4. Is refacing cabinets worth the cost compared to painting?
Refacing is more expensive than painting but cheaper than replacing. It is worth the cost if your cabinet doors are damaged or if you absolutely hate the style of the door (e.g., wanting to switch from arched to Shaker). If the doors are in good shape and you just dislike the color, painting is the better financial choice.
Q5. What is the hardest part of updating cabinets yourself?
The hardest and most critical part is almost always the preparation. whether painting or refacing, failing to clean off grease and sand the surfaces properly will lead to peeling finishes later. Patience during the prep stage is the biggest challenge but ensures a professional, long-lasting result.
Conclusion
Updating a kitchen doesn’t require tearing everything out. By choosing practical improvements, you can update kitchen cabinets without replacing them and still achieve a cleaner, more modern space.
Focus on changes that improve both appearance and function, and tackle them at a pace that feels manageable. Small updates done thoughtfully often deliver the biggest results.